Bathroom revamp by Suzanne

DSC_8668-686x1024a.jpg

Would you like a sneak peak as we revamp one of the smallest albeit most important rooms in our more than 125 year-old home? Since it's one of the most highly used rooms in our home we felt it deserved some attention. Maybe you think the bathroom looks fine as is. True. But a closer inspection reveals tired, chipped and peeling fixtures. Even though we invested money and endured toxic fumes to have them resurfaced and painted, they became chipped again. The sink is an eye sore, the bathtub is dangerous to our bottoms (ouch!) and the toilet wobbles.

So a few weeks ago, after carefully measuring the space, Simon set off to a local hardware store and picked out a new bathtub and faucet, sink and toilet. When he saw something he liked, he sent photos with a text message for approval. And that was that.

Now to find the right attitude while we deal with the disruptions. Now, when we have to pee in the middle of the night we have to travel down two sets of stairs and back up again. By the time I get back into bed I'm wide awake! No more herbal tea before bedtime for now.

But this a first world problem and I deserve no pity. Given all the people in the world experiencing homelessness, I'm grateful for our cozy home and that we have the means with which to renovate it.

DSC_8660-686x1024.jpg

We love the brick chimney. The plan is to remove and use the wainscoting that's covering it up to repair any damage that needs to occur to the wainscoting in the rest of the bathroom. We talked about removing all of it and tiling instead, but it's in such good condition and suits the character of our home.

DSC_8795-686x1024a.jpg

We need to replace the old pine floor, which needs to be torn up to deal with the plumbing. We're going with this tile. The colour was inspired by a colour pulled from the bricks in the chimney.

DSC_8659-686x1024a.jpg
DSC_8679-686x1024b.jpg

See what I mean? Eye sore.

DSC_8701-686x1024.jpg

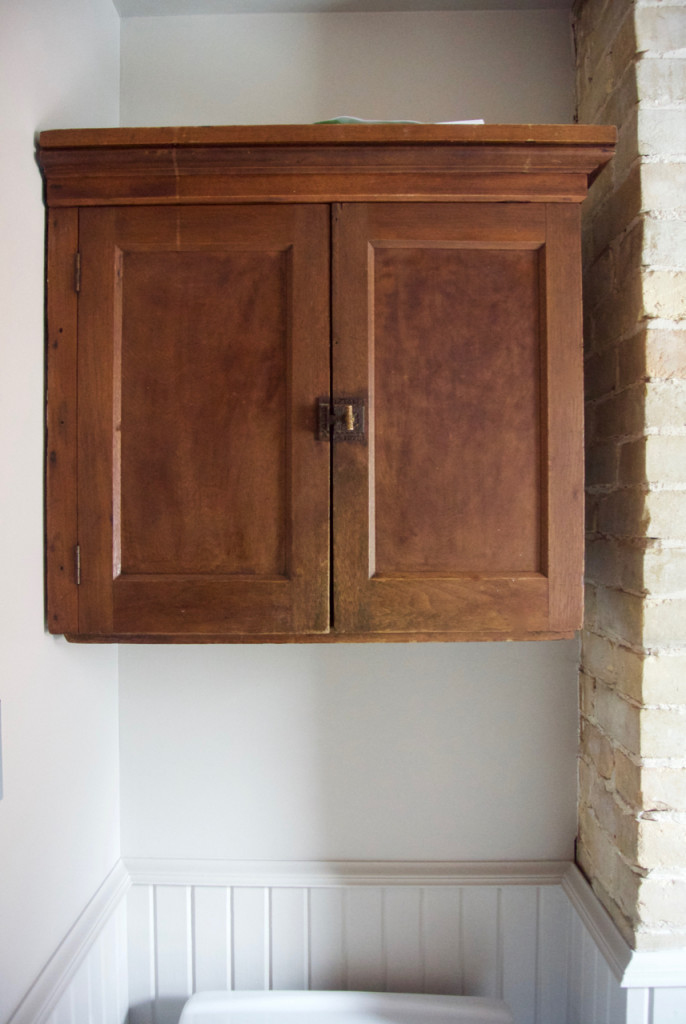
This cabinet, which must be as old as the house, needs a little love and care but it stays. Out with the old and in with the new, but not all the time.

DSC_8709-686x1024a.jpg

Renovation is underway and I have some painting to do!

DSC_8768-686x1024.jpg

Three hundred pounds of cast iron sitting in a snowbank waiting to be picked up. We offered it for free on kijiji and had loads of interest.

Life changing loaf of bread by Suzanne

DSC_8471-686x1024a.jpg

I'm a fan of bread that looks and feels like a brick so when I saw this recipe I knew I had to try it.

Will it change your life? I can't say for sure but I do think it’s a wonderful recipe to add to your repertoire. It's chewy, dense, filling, hearty, healthy, moist and delicious, especially when toasted and topped with your favourite topping.

This bread seems to compliment whatever you put on top - avocado, goat cheese, peanut butter, sliced tomato or cucumber. And adding a topping transforms a single slice into a meal.

DSC_8469-1024x762b.jpg
DSC_8466-1024x762c.jpg
DSC_8479-686x1024.jpg
DSC_8449-734x1024a.jpg

You mix and bake this loaf in the same pan. Basically you're left with a dirty spoon, pan and measuring cup, making clean up easy.

This recipe also lends itself to substitutions, providing you stick to the same proportions. For example, use pumpkin or sesame seeds instead of sunflower seeds or use a bit of each. Substitute rolled spelt or quinoa for rolled oats, almonds instead of hazelnuts, honey instead of maple syrup. I love when recipes are forgiving like that.

The only ingredient that must remain constant is the psyllium seed husks, which hold all the ingredients together without using flour. Psyllium is very high in fibre, helps reduce cholesterol, aids digestion and gets your bowels moving or slows them down depending on your situation. It's available at health food stores but if you can't find it where you live you can buy it on line.

DSC_8455-686x1024a.jpg
DSC_8462-670x1024a.jpg

The Life-Changing Loaf of Bread

1 cup / 135g sunflower seeds

1/2 cup / 90g flax seeds (if you use ground flax seeds add more water)

1/2 cup / 65g hazelnuts or almonds I I roughly chop)

1 1/2 cups / 145g rolled oats

2 Tbsp chia seeds

4 Tbsp psyllium seed husks (3 Tbsp if using psyllium husk powder)

1 tsp fine grain sea salt (add 1/2 tsp if using coarse salt)

1 Tbsp maple syrup or other sweetener of your choice

3 Tbsp melted coconut oil. I imagine you could use other healthy oils too, although I haven't tried.

1 1/2 cups / 350ml water. Add a little more if it doesn't seem wet enough.

In a flexible, silicon loaf pan combine all dry ingredients, stirring well. A flexible, silicon loaf pan is best because you can test to see if the dough is holding together, and it's easy to remove the loaf from the pan, but a regular pan should be fine, especially if you line it with parchment.

Whisk maple syrup, oil and water together in a measuring cup. Add this to the dry ingredients and mix very well until everything is completely soaked and dough becomes very thick (if the dough is too thick to stir, add more water until the dough is manageable). Smooth out the top with the back of a spoon.

Let sit out on the counter for at least 2 hours, or all day or overnight. To ensure the dough is ready, it should retain its shape even when you pull the sides of the loaf pan away from it it.

Preheat oven to 350 degrees Fahrenheit.

Place loaf pan in the oven on the middle rack, and bake for 20 minutes. Remove bread from loaf pan, place it upside down directly on the rack and bake for another 30-40 minutes.

Bread is done when it sounds hollow when tapped. Let cool completely before slicing. Important!

Store bread in a tightly sealed container for up to five days. Freezes well too but slice before freezing for quick and easy toast.

DSC_8515-686x1024b.jpg

Gluten-free breakfast bars by Suzanne

IMG_5575-686x10241.jpg

I love this recipe for gluten-free breakfast bars by Susan Jane White. Her food story is really interesting.

Her original plan in life was to become an academic but that all changed when she became ill, quite literally on death's door, when she was a university student at Oxford. No one could diagnose what ailed her.

Having no luck with conventional medicine, she eventually came to realize wheat, dairy and cane sugar might be at the root of her problem. Thus began her return towards good health, eating and cooking without these foods, and a career as a cookbook author and food blogger.

Read her story here.

We eat these breakfast bars any time of the day. Oats, almond flour, walnuts, dates, banana, and sunflower seeds make them especially nutritious and delicious. They are particularly great if you're on the go and want to sink your teeth into something satisfying and nutrient dense. Something to sustain you until you sit down for a proper meal.

IMG_5561-686x1024.jpg

If gluten-free really matters to you, be sure your oats say gluten-free on the package. Also, don't use the large rolled oats but the smaller ones. I've made the recipe using both types and, although they taste equally good, they hold together better using the smaller oats. If you only have the large oats, try blending them in the food processor for a minute. That did the trick for me.

IMG_5566-686x1024b.jpg
IMG_5571-686x1024c.jpg

Oats will turn bitter if you let them get too brown. Also important is to resist cutting until they have completely cooled down. Otherwise, you won't get a nice clean cut and they will be prone to crumble. So wait a bit.

Gluten-free breakfast bars

140 ml melted extra virgin coconut oil

80 ml good quality honey or maple syrup

2 handfuls of regular pitted dates (100g), chopped

1 banana, mashed

1-2 teaspoons cinnamon

freshly grated nutmeg

a generous pinch of sea salt

Slightly more than 2 cups (200g) regular rolled oats and not jumbo oats (certified gluten-free if that's important to you)

Just under 1 cup (100g) of walnuts, roughly broken

1 cup (100g) ground almonds

Handful of sunflower seeds or pumpkin seeds

Preheat oven to no higher than 340 degrees fahrenheit or else the bars will crumble.

Line a pan no bigger than 8x10 with enough parchment so you can lift the bars out of the pan later.

Mix together oats, almond flour, walnuts, sunflower seeds, salt and spices.

Gently melt the coconut oil with honey for 2 minutes in a small pan over low heat. Chop the dates and add them to the oil and honey. Add the mashed banana. Once these ingredients are thoroughly mixed, add to your dry mixture, and combine well.

Scrape into your pan. Press down firmly with your fingers or spatula.

Bake for 30 minutes until lightly golden. Let cool completely before slicing.

IMG_5574-686x10241.jpg

Coconut red lentil soup by Suzanne

IMG_5533-686x1024.jpg

I love a bowl of soup and this is hands down my latest favourite recipe.

It's easy to make and ready to serve in 45 minutes. It's the most beautiful shade of yellow-orange. Plus it's wonderfully flavourful with a spiced coconut broth and thickened with red lentils, which are full of fibre, protein, iron and vitamin B. So it's nourishing, too.

IMG_5534-686x1024.jpg

Coconut red lentil soup

1 medium onion, finely chopped

2 tablespoons vegetable oil (I use coconut oil)

1 tablespoon finely chopped peeled fresh ginger

2 garlic cloves, finely chopped

1 teaspoon ground cumin

1/2 teaspoon ground coriander

1 teaspoon turmeric

1 teaspoon salt

3 cups water or broth (add more if you like a thinner soup)

1 1/2 cups dried red lentils (10 oz)

1 (13- to 14-oz) can unsweetened coconut milk

2 medium zucchini cut into 1/4-inch dice

1 cup loosely packed fresh cilantro sprigs

Cook onion in oil in a 3 1/2- to 4-quart heavy pot over moderate heat, stirring occasionally, until edges are golden, about 6 minutes.

Add ginger and garlic and cook, stirring, 1 minute.

Add cumin, coriander, turmeric and salt, and cook, stirring, 1 minute.

Stir in water, lentils, and coconut milk, then simmer, covered, stirring occasionally, 5 minutes.

Stir in zucchini and simmer, covered, until lentils and zucchini are tender, about 15 minutes.

Make any needed adjustments. Add more water if the consistency needs to be thinned out a bit.

Season with salt and serve with cilantro sprigs scattered on top and maybe a drizzle of coconut milk. A squirt of fresh lime juice would be nice, too. Maybe even a bit of lime zest!

IMG_5517-777x1024.jpg

Applesauce, heirloom guilt and clutter by Suzanne

Sometimes we love the things we inherit because they hold deep meaning for us or they fit into our lives and support us nicely. This doesn’t always happen. Whether they are gifts we welcome into our lives or not we are expected to accept them and appreciate them.

Even if they are things we don’t like, want or need we find ourselves accepting them anyway. Even when we have more than we need or can take care of, or the room to store. And darn it, once these unwanted gifts are in our possession, we feel we can't let them go. The result is we end up living amongst things that don’t support the life we live today. They become clutter.

Maybe we accept them because refusing bequeathed gifts feels like betrayal or disrespect. Or maybe we hang on to these things because we worry if we let them go our memories go, too.

For many years, my parents had a grandfather clock that hung on the wall. My memories of that clock aren't great. It would ring out every 15 minutes and every hour it would ding dong the appropriate number of times depending on the hour. Whenever I visited Mom and Dad when the kids were little and needy I was often sleep-deprived, and that darn clock was constantly waking me and robbing me of rest. Before naps or before bed at night I would cover it with towels to try and muffle the sound. Still, it would wake me!

Imagine my surprise when I discovered that, among all Dad's personal possessions, he was leaving the clock to me! My sister and I had such a good laugh about it. How comical!

I'm almost nervous to tell you I didn't take the clock and I don't even feel bad about it. It found a good home, however.

I accepted the love given with the gift. Dad thought it would look nice in our dining room, which is very sweet. But still, I let it go.

I chose not to accept it even though I loved him. I already have enough clocks, it triggers bad memories of horrible sleep deprivation and, honestly, I felt it deserved to be with someone who would really appreciate it. Plus I knew I didn’t need it to remember him.

Which brings me to applesauce!

On one of my final visits to Mom and Dad's before Mom died, I experienced a feeling of great relief to witness how much love there was in their home despite the challenges.

It was a difficult situation; Mom had Alzheimer's and was living at home with my elderly father as her primary caregiver. Initially he struggled in his new role as caregiver and to accept what was happening to Mom. But recently he had really stepped up to the plate and was doing his very best.

During that visit, I decided to be helpful by making applesauce from a bunch of apples threatening to go bad. Mom was approaching the late stage of this disease and rarely talked. She watched me peeling apples for a while and then told me what a patient person she thought I was. 

Yesterday, years later, as I peeled apples alone in my own kitchen, I couldn't have felt closer to the two of them even if I had a room full of heirlooms. 

Tahini-date salted caramels by Suzanne

When you're hankering for something sweet with no dairy, gluten or refined sugars I suggest you make these yummy caramels. Easy to make and require only a few ingredients. Their complex flavour comes from the tahini and cardamom combination.

IMG_6079-686x10241.jpg

I use medjool dates, which are nice and soft. If you use the typical dates from the grocery store try soaking them in warm water first to soften. This is especially important if you don't have a powerful processor or blender.

DSC_7402-686x10241.jpg
DSC_7412-686x10242.jpg

If you choose to add the ground cardamom buy cardamom pods instead of ground cardamom if possible. The whole spice stays potent for a year (or longer) and the seeds nestled inside the pods can be ground quickly with a mortar and pestle or spice grinder. Ground cardamom, by contrast, loses its flavour rapidly.

DSC_7430-686x1024.jpg

The original recipe called for two tablespoons of coconut oil but I found this too much as it would liquefy during the blending process and pool here and there after I spread it in the pan. The caramels still tasted delicious but optically I didn't like it so reduced the amount.

DSC_7386-686x1024.jpg

If you're not familiar with tahini, it's a paste made from ground sesame seeds and is one of the ingredients found in the ever popular hummus. It's been nice to discover, over the years, how to use it in other ways, too. We like it spread on toast with a little honey on top. I also like to add it to dressings for drizzling on top of salads or roasted vegetables.

And now I can enjoy it in a caramel, and you can too.

Tahini-date salted caramels with cardamom (inspired by this recipe)

1/2 cup tahini

1 cup pitted dates

1 tbsp coconut oil

1/2 tsp ground cardamom (optional)

Finishing salt and/or sesame seeds for sprinkling

Add tahini, coconut oil and ground cardamom to your blender or food processor and blend. Add pitted dates (I add them one at a time through the small opening) and blend until you have a creamy and smooth paste. You may have to scrape down the sides and continue blending.

Spread the mixture in a loaf pan lined with parchment paper (with enough overhang for lifting out of the pan later) and smooth the top with a spatula. Sprinkle with rock salt and/or sesame seeds and pop in the freezer for an hour or more or until set. Lift out of the loaf pan, cut into squares and serve immediately.

These get soft quickly so enjoy straight from the freezer and store any leftovers in a lidded container.

DSC_7558-686x10241.jpg

The most compelling reason to keep your clutter to a minimum by Suzanne

I'm apart of a large and ever-growing group of people who has had to downsize for a parent who, over the years, didn't pare down or separate the meaningful and useful things from the clutter. 

Almost a year ago, my sisters and I processed and cleared everything from my Dad's home (my mom died several years earlier). I wrote a bit about it here.

I was lucky I could share the responsibility with my other siblings. It made the job less overwhelming and easier to execute with some amount of grace. But a job of this nature still takes a toll, emotionally, physically and financially.

Above: My Mom's beautiful collection of tea cups found a good home. They went to Beaverbrook House, a historic home in Miramichi that holds tea services open to the public.

Above: My Mom's beautiful collection of tea cups found a good home. They went to Beaverbrook House, a historic home in Miramichi that holds tea services open to the public.

It can require long plane flights, taking time off work without pay and leaving behind a family to cope in your absence.

And if you and your siblings are not on the same page downsizing a parent can be rot tension and arguments.

All that plus the actual physical labour involved. And on top of that people are often tackling this responsibility in the midst of grieving. It's a lot!

Above: We sorted through all of Mom's artwork and sketches.

Above: We sorted through all of Mom's artwork and sketches.

Above: What we didn't keep for ourselves, my sister framed with old frames found around the house and we added them to the items for sale. It feels good knowing Mom's art will be hanging in so many homes.

Above: What we didn't keep for ourselves, my sister framed with old frames found around the house and we added them to the items for sale. It feels good knowing Mom's art will be hanging in so many homes.

I've read about cases where people pull up a dumpster and get rid of stuff that way. But that wasn't for us. We worked hard to deal with Dad's belongings respectfully and thoughtfully.

We separated the meaningful stuff from the clutter. We doled out heirlooms diplomatically and sensitively, and found good homes for other items. We advertised and held a moving sale. What didn't sell we donated to worthy causes. What was left went in the garbage.

It took 5 weeks in total, working day and night. And we managed to do it gracefully, without tension or arguments.

Above: We polished up the furniture and staged the house for the sale, which took place over two days.

Above: We polished up the furniture and staged the house for the sale, which took place over two days.

Above: My sister was full of clever ideas. One of them was to bundle the towels and facecloths rather than sell them individually. She was right! They were snatched up quickly.

Above: My sister was full of clever ideas. One of them was to bundle the towels and facecloths rather than sell them individually. She was right! They were snatched up quickly.

If you've ever gone through this experience you become acutely aware of something: this is what's in store for your children or next of kin. You feel a strong resolve to not heap upon them a similar burden. 

That’s why we shouldn’t wait. We should clear our clutter and lighten our load now.

If we spend the first 40 years of our lives accumulating and collecting, it seems to me we should spend the next 40 years letting go.

IMG_08871.jpg
IMG_0788-768x10242.jpg

Holiday Party and Ornament Exchange by Suzanne

DSC_5532-686x10241.jpg

Make your house fair as you are able, trim the hearth and set the table. Eleanor Farjeon (1881-1965)

Every early December, for the past 10 years, my friend Cindy thoughtfully decorates her home, stocks up on red and white wine, prepares sweet and savory edibles, displays them on lovely plates, platters and wooden boards, and invites about 20 neighbourhood moms over to mix and mingle. Before the evening ends, we gather around the tree and exchange Christmas ornaments.

Such hospitality is wonderful for folks like me who are slow to catch the Christmas spirit.

Here's a peak around her cozy and elegant home on that particular night. Maybe it will ignite your Christmas spirit, too.

DSC_5481-686x10241.jpg
DSC_5498-686x10242.jpg
DSC_5560-686x10243.jpg

Above: A single branch trimmed with small felt ornaments in a pot topped with moss. Simple and lovely.Above: I wished I had taken a photo of this yummy Warm Black Bean and Chipotle Dip before I dug into it. It's served pretty much right out of the oven, hence the kitchen towel around the handle. It protects hands and fingers, and it's pretty.

PicMonkey-Collage-1024x1024.jpg

Above: Less is more; three wise men made from recycled tin from Bloomfields; a row of poinsettias and a platter of pomegranates.

DSC_5526-686x1024.jpg

Above: Paperwhites and dogwood branches.

PicMonkey-Collage1-858x10241.jpg

Above: Decorations to be treasured for years to come. I love the wooden tree, advent calendar, and the Santa nesting doll. The beautiful glass Christmas trees are from Bloomfields.

DSC_5465-686x10241.jpg
DSC_5472-686x10242.jpg
DSC_5585-686x10243.jpg

Above: Everyone brings a wrapped ornament and places it under the tree. We draw numbers from a hat, gather near the Christmas tree for dessert, and then take turns choosing a wrapped ornament. You never know what you'll get.

DSC_5611-686x10241.jpg
DSC_5634-686x10242.jpg
DSC_5537-561x10244.jpg

Making herbal sachets by Suzanne

DSC_5387-685x1024.jpg

I purchased bags of dried lavender when we were in the South of France this summer. Its scent was irresistible. After all, lavender is one of the most popular aromas in the world, one that's been known to help change moods for the better, ease stress, soothe a headache, as well as reduce anxiety and insomnia.

DSC_5375-991x1024.jpg

There's this little East Indian grocery store here in the city where you can buy basmati rice in nifty burlap bags. I'm no hoarder but I can't bring myself to throw the bag out after the rice is gone. I'm a fan of burlap, and I love the red and blue printing on the bag. And the picture of the elephant, of course.

The other day I opened the cabinet and saw the stack of burlap rice bags on one shelf and the bag of lavender below it and I had an idea. Lavender sachets!

DSC_8544-685x1024.jpg

Sachets are small cotton pouches filled with dried herbs and/or flowers, and are the traditional way to scent drawers, cupboards and closets.

Lavender is a popular filler but any fragrant dried herb can be used: eucalyptus, lemon balm, peppermint, chamomile. Whatever herbal aroma inspires you. You can mix different herbs together, too. You aren't limited to herbs either; dried flower petals do quite nicely, too.

When I ran out of lavender I used the dried peony and lemon balm saved from the garden.

DSCF81941.jpg
DSC_4647-686x10242.jpg
DSC_8426-685x10243.jpg

To boost the aroma add a few drops each of lavender, geranium and lemon. Essential oils help ensure the scent of the sachet is tangible and effective.

DSC_8345-685x10241.jpg

As for fabric use one that's breathable, like cotton and linen. I washed the burlap before sewing to ensure it was nice and soft, and it sewed up beautifully.

If you have old handkerchiefs or bed linen, use those. If you're handy with a sewing machine sew your own sachets. If you don't sew, create simple little bundles from pieces of cut cloth and tie the ends together with ribbon or string. Or you can use the little muslin bags often found in the spice section at your natural food store.

DSC_8487-685x10241.jpg

There are tons of tutorials on the internet offering different methods for sewing your own, like this one.

DSC_8512-685x1024.jpg

Place under a pillow or slip one into your pillowcase. Tuck one in your sock and underwear drawer, and between your bath towels and linens. Throw one in the dryer to make your clothes smell fresh and scent the surrounding air.

DSC_8582-685x10241.jpg

From time to time massage sachets to release essential oils to ensure a longer lasting smell.

Herbal sachets make wonderful gifts for old and young alike. A stack of two or three tied with a ribbon would be delightful.

Make your own flaxseed crackers by Suzanne

I present to you the flaxseed cracker.

Unlike most crackers, this cracker is rich in fibre, protein and healthy fats. That's because flaxseed is considered a superfood, jam packed with nutrients.

If you're like me you will end up substituting this for that and/or adding different seasonings or flavours. For example, if you don't have chia seeds, add extra pumpkin seeds. Jazz them up with a little cinnamon or go for something savoury like garlic powder and rosemary. Here’s a basic recipe to play with:

Flaxseed Crackers

1 cup flax meal (grind the seeds yourself or buy ground)

1/2 cup flaxseeds (golden or dark)

1/4 cup chia seeds

1/4 cup hulled sesame seeds

1/2 cup sunflower seeds (unsalted)

1/2 cup pumpkin seeds

1/2 tsp of salt or to taste

3 cups water

Combine dry ingredients and water.

Stir by hand. The mixture will be soupy at first but will become more doughy as the water is absorbed.

Soak overnight or for a couple of hours.

Your mixture will be the consistency of a very thick batter. Spread onto greased cookie sheets lined with parchment until about 1/8 inch thick.

Score with a spatula or knife into your desired size. I wait until mine have been in the oven for at least an hour before I score them. I think it makes for a cleaner cut.

I bake mine slowly at 250 degrees until completely dry and crispy. This could be up to 4 hours. If in a hurry, use a slightly hotter oven for a shorter amount of time. Just keep your eye on them so they don't get too dark around the edges. Sometimes I rotate the sheet halfway through to ensure even baking.


My opinion about new technologies by Suzanne

DSC_7340-685x1024.jpg

While having breakfast in a restaurant recently, I saw a couple sitting across from each other. Each was reading a newspaper. It made me think how this particular scene, a couple reading the morning news instead of chatting or connecting, would appear benign to most onlookers and not cause them to fret that the couple were reading and not connecting through conversation. But if they were staring at their phones? I imagine it would get some people's knickers in a knot.

anti-social-1024x714.jpg

If there are two camps - those who think smart phones are making us asocial, and those who think we should loosen up a little and suspend judgment that new technologies are ruining social relations and making us disconnected - I fall into the latter.

I'm suspicious of many of the negative warnings about new technologies and the lamenting about how society is abandoning the more wholesome media we grew up with. After all, it too was considered harmful when it was first introduced!

Socrates famously warned against writing because it would make us forgetful. The French statesman Malesherbes warned against getting news from the printed page because it socially isolated readers and detracted from the uplifting group practice of getting news from the pulpit. The writer Douglas Adams observes that technology that existed when we were born seems normal, anything developed before we turn 35 is exciting, and whatever comes after is treated with suspicion.

I'm not saying all new technologies are harmless or that there is no need to discuss how they affect us. It's just I'm reluctant to pathologize behaviour which is perfectly normal in today's life. I'm more inclined to follow this advice recently posted on Tumblr:

Do not let adults steal this generation from you. Relish in selfies. Snapchat pictures of coffee to your friends. Huddle around an iPhone to watch Vines. Shamelessly love this generation's commodities, like how our parents loved their commodities, like disco or Hammer Pants or whatever else. Do not let angry adults take away your chance to experience the uniqueness of right now.

A peek inside another home on the 2015 Glebe House Tour by Suzanne

As promised, here is a peek inside another home. What I love about some of the older homes in this neighbourhood is how a very traditional facade can give way to something unexpected. As is the case with this breathtaking home, which is one of five on this fall's Tour.

DSC_4719-686x10241.jpg
-2-1024x10242.jpg
1-686x10243.jpg
-21-685x10245.jpg
-4-685x10246.jpg
5-685x10247.jpg

Stay tuned for more sneak peeks at the remaining three homes. In the meantime, check out all the details here and buy your ticket soon!

A classic summer drink; blender lemonade with strawberry by Suzanne

DSC_4329-686x1024.jpg

What attracted me to this recipe for blender lemonade was the use of the whole lemon (minus the seeds and some of the pith to avoid bitterness). If you're like me and love the addition of citrus peel or zest to a recipe or if you like your lemonade nice and tangy, give this frothy lemonade a try. I love the idea of plunking everything in the blender and giving it a one minute zap.

I used a well-scrubbed organic lemon and added frozen strawberries just for fun. Frozen blueberries or a couple of chunks of frozen pineapple could work too. Fresh mint makes for a perfect garnish.

DSC_4125-686x10241.jpg
DSC_4137-686x10242.jpg
DSC_4141-686x10241.jpg
DSC_4320-686x1024.jpg

Blender lemonade with strawberry

Here's the basic recipe which serves two. You can double or triple depending our how many people you're serving.

1 whole organic lemon, scrubbed

2 cups of very cold water

5 large frozen strawberries ( or 5 ice cubes if skipping the frozen berries)

2 to 3 tablespoons of your favourite sweetener

Wash your lemon, remove the thickest part of the pith at one end, cut into quarters (or eights if it looks really seedy) and remove seeds.

Add to the blender along with frozen strawberries or ice cubes, cold water, sweetener of your choice.

Blend for a full minute until the mixture is frothy. Pour over ice.

Top with mint and serve immediately.

DSC_4344-686x10241.jpg

Raw chewy chocolate squares by Suzanne

DSC_3203-686x10241.jpg
DSC_3275-1024x7442.jpg
DSC_3327-686x10243.jpg

These squares deserve a better name than Raw Chewy Chocolate Squares. It describes them well; they're no-bake, are a pleasure to bite into and wonderfully chocolaty. But somehow it fails to describe their essence, which is pure natural deliciousness. I came across the recipe by way of Kris Carr who got it by way of someone else, and Raw Chewy Chocolate Squares is what they call them.

If you're hankering for something sweet but also nourishing these squares satisfy beautifully. These are sweetened primarily with dates (I used lovely soft medjool dates) but the ground almonds and coconut flour lend a sweetness, too.

DSC_3268-686x1024.jpg

You need a food processor or blender to make them.

Raw chewy chocolate squares

Bottom layer:

  • 2 cups of ground almonds

  • 6 tablespoons coconut flour

  • 1 cup pitted dates, chopped

  • 4 teaspoons of water

Blend until ground down. Start with 1 teaspoon of water and add more only if needed. Press the mixture into the bottom of a square pan.

Top layer:

  • 3 cups pitted dates, well packed

  • 1 cup coconut milk. It should be thick (I used the thick stuff at the top of the can)

  • 18 tablespoons cocoa powder

  • 1/2 cup melted coconut oil

  • 1/2 teaspoon vanilla extract

  • 1/4 teaspoon salt

Puree dates first.

Then add the coconut milk, cocoa powder, vanilla and salt. Puree until smooth and then add the oil and blend until incorporated.

Spread this mixture over the crust. Keep in the fridge for 8 to 12 hours or in the freezer for 4 to 6 hours. I like to keep mine in the freezer.

Top with drizzled chocolate, grated coconut, or anything else you fancy.

xo

The beauty of wee flower arrangements by Suzanne

DSC_31051-685x1024.jpg

I believe studies that say spending only a few days around flowers, at work or at home, boosts well-being and makes us more compassionate.

These days I travel no further than my back yard to find flowers to bring inside. I love how flowers breathe life into a space. I love how they help me stay connected to beauty and nature.

DSC_1405-685x10241.jpg

Early this month peonies were plentiful. With four bushes I could easily stuff several large vases until overflowing with blooms. When I ran out of vases, I hung them to air dry.

DSC_19661-685x10241.jpg
DSC_3026-686x10244.jpg

My garden flowers in bloom right now are not the kinds that lend themselves to big bold arrangements but I'll be bringing them inside, too. These days I'm thinking smaller scale and choosing tinier arrangements.

Wee flower arrangements are one of the most effortless and least expensive (if you have to buy your flowers from a shop) ways of bringing flowers into your home. They require minimal flowers, leaves or grasses, and yet tiny bouquets provide equal beauty and benefits as larger ones.

First you need to find the right sized vases. If you don't have any tiny vases, eggcups, liqueur glasses, shallow bowls or an empty vanilla bottle will do.   Next you decide what goes in them. When you take a good look around a garden it's surprising how many choices there are.

DSC_2698-685x10241.jpg
DSC_31101-686x10243.jpg
DSC_3113-1-686x10244.jpg
DSC_3100-686x10245.jpg

Smaller arrangements can be grouped together or amongst other plants and objects, or placed individually in a small spot, on a bathroom shelf or window sill.

DSC_3043-685x10241.jpg
DSC_3121-686x10242.jpg
DSC_3155-686x10243.jpg

Instead of a tiny vase I chose a large cylindrical one for this arrangement. I added an inch or two of water, a stem each of hosta flower and day lily to stand no taller than the vase, and floated two marigold flowers in the bottom. Simple!

I look forward to finding new ways to enjoy whatever else my garden provides and to soaking up all the benefits.

xo

Infuse your drinking water by Suzanne

DSC_2435-685x1024.jpg

Drinking enough water is one of the best things you can do for your body; it helps regulate body temperature, protects vital organs, keeps your skin looking good, energizes muscles … the benefits are numerous. Now that the warm weather is here, I'm promising myself to drink more water. To make it more interesting and beautiful (I'm all about elevating the mundane) I'm making it my summer routine to drink infused water.

Simply put, infused water is water to which fruits, veggies, herbs and/or spices have been added.

There are loads of claims floating about the web about the benefits of drinking infused water. It flattens your belly! It's the ultimate detox and weight loss secret! It boosts your immunity!

I think those things happen only because you choose to drink infused water INSTEAD of juices, soda and vitamin waters.

The main benefit of infused water is increased hydration. Infused water is pretty, which is important because you eat and drink with your eyes. If a beverage looks colorful and healthy, you're more inclined to drink it, which helps keep you hydrated.

Honestly, a pitcher of infused water on a dinner party table can be like beautiful art. Plus kids seem to really like infused water, too. One time, I added cinnamon sticks to the water and my son said his friends talked about it for days.

DSC_24071-686x1024 1.jpg
DSC_2419-686x1024 2.jpg
DSC_2435-685x1024.jpg

Today, I used what was on hand and came up with an infusion of cucumbers, lemons, and limes along with a few sprigs of fresh mint for a subtle touch of sweetness.A good rule of thumb is to infuse for 1-2 hours at room temperature or in the fridge for 3-4 hours to achieve potent flavor. If you like your water strong and tangy like I do, infuse overnight or up to 12 hours.

Be careful with citrus rinds! They can create bitter flavors after just a few hours. One way to avoid this is to remove the rinds.

DSC_2459-686x1024.jpg

As you drink, remember to add more water to your container when the water is half way down. That way, you mix the flavourful water with the new water. After a day or so, the flavour will be diminished and it will be time to make a new batch.

Also, you can eat the leftover cucumbers for their fiber and nutritional content. I always thought cucumber didn't pack much of a nutritional punch, however, cucumber is chock full of goodness - vitamins C, A, and K plus calcium, iron and potassium.

Over the summer I plan to post more refreshing concoctions of infused water. The options seem limitless.

My humble garden by Suzanne

DSC_1611-686x1024.jpg

Once, over a long-distance phone call, I told my dearly departed Dad I had a garden. After arriving for a visit, months later, he took one look in our back yard and said, “Where's your garden?”

moms-garden-1024x623.jpg

For him, a garden meant not just plantings of annuals and perennials, and a few pots of herbs and flowers, but rows and rows of vegetables. Like the amazing garden my mother grew and tended to entirely on her own in the backyard of our family home.

I love the whole idea of it and I'm not afraid of the work involved but I don't grow vegetables in my garden. That would require displacing the perennials or tearing up the lawn. And then where would we put our tables and chairs for the outdoor dinner parties we like to host? Not willing to sacrifice the space. Not just yet.

But here's a look at some of what I do have.

The basil I planted is doing really well and it's only mid June. Is it because of the eggshells? I have three varieties: Italian, sweet, and Thai. Not quite enough to make pesto but plenty to pinch and pluck and place on an open face goat cheese sandwich with tomato slices and drizzled with olive oil, or to flavour a coconut milk curry.

DSC_1684-686x1024 1.jpg
DSC_1666-686x1024 2.jpg
DSC_1606-685x1024 3.jpg
DSC_1551-686x1024 4.jpg
DSC_1552-686x1024 5.jpg
DSC_1656-686x1024 6.jpg

I planted two kinds of parsley: Italian or flat leaf (my favourite) and curly leaf. Good for making tabouleh or adding to chimichuri. I've got plenty of mint; three kinds of peppermint and a pot of spearmint.

DSC_1566-707x1024 1.jpg
DSC_1556-686x1024 2.jpg

And I almost forgot, lemon balm! It's from the mint family, too. I love the smell and although I didn't harvest it last year, I intend to make good use of it this fall. Many believe lemon balm has calming effects so they take it for anxiety, sleep problems, and restlessness. It's also used for digestive problems. I'll use the flavourful leaves to brew tea, flavour fruit or green salad and season fish, or maybe include its stems in a summer bouquet.

As you know, mint is a spreader so I'll have to keep an eye on the stuff not contained in pots. But I'm hoping the mint I planted around our compost will spread like crazy and conceal the not-so-attractive yet very useful bin. There should be lots to add to salads, and to make mojitos and tea. We drink lots of mint tea. Which reminds me of a funny story…

DSC_1675-686x1024 1.jpg
DSC_1570-686x1024 2.jpg

We were out of mint tea, and Simon noticed me going out into the garden and cutting fresh mint leaves whenever we wanted to brew a pot. One night I was out and, wanting mint tea, he decided to do the same. When I came home I found him enjoying a pot of tea he brewed and he offered me a cup. One sip and realized it was not mint tea at all, but had been made with basil. He had harvested the wrong herb! Moral of the story: we really need to get a back porch light.  The poor man was snipping leaves in the dark.

I've added a small pot of lavender to the mix. It's honestly one of my favourite scents. No blooms yet but still early days. And that yellow pot you see, it's a clay pot I spray painted years ago. I love the patina.

DSC_1668-686x1024 1.jpg
DSC_1671-686x1024 2.jpg

What would a garden be without flowers? Too late to show you the solomon’s seal or bleeding heart, but a perfect time to show you peonies and marigolds.

DSC_1563-686x1024 1.jpg
DSC_1575-686x1024 2.jpg

The marigolds growing in this window box last year reseeded themselves. Hooray! I wonder what shade of orange or yellow they will be?

DSC_1637-686x1024.jpg

And geraniums! Not yet abundant with blooms but soon. I will forever have geraniums because they remind me of my mom.

DSC_09961-685x1024 1.jpg
DSC_1004-686x1024 2.jpg
DSC_1595-686x1024 3.jpg

The day lilies haven't bloomed yet nor has the phlox. They come later. But did I tell you what I did with some of my hosta? Instead of buying new plants for the front porch, I thinned my hosta and put them in pots. 

Last but not least, my constant gardening companion. Somehow the garden wouldn't be the same without his peaceful loving presence.

Waste not, want not; using eggshells in the garden by Suzanne

I feel good when I get the most out of something before I throw it away.

Once, when I was in a (manic?) phase about not wasting, I would carefully open every piece of mail received so as to not rip the envelope. Then I would turn the envelope inside out and, using a glue stick, put it back together. Then I would have a perfectly nice stack of envelopes ready to reuse.

I don't do that anymore and although I'm the best recycler in our family I discard things still useful.

DSC_1028-686x1024.jpg

For example, eggshells. Like most people, I typically drop them into the food waste bin (we have a green bin system here in Ottawa whereby all food scraps get recycled) or in the compost. But lately I've been inspired to use eggshells more intentionally and this Spring I started using them in the garden.

DSC_1259-686x1024.jpg

I've been saving the shells from all the eggs we eat. First I rinse them (so they don't get stinky) and keep them in a bowl next to the sink to dry out. You can also dry them in an oven, at a temperature no higher than 175 degrees Fahrenheit, for about 10 minutes or until completely dry. If you don't want to turn your oven on, dry them in the hot sun. They are easier to crush when they are dry.

DSC_1263-686x1024 1.jpg
DSC_1270-686x1024 2.jpg
DSC_1281-686x1024 3.jpg

Which leads me to the next point - eggshells decompose faster and the nutrients are made more readily available if you pulverize them first. You could use a coffee grinder, food processor or a mortar and pestle.

Add crushed eggshells to the soil, either in your planting hole or sprinkle them directly in the soil around the base of the plant.

DSC_1044-686x1024.jpg

Eggshells are rich in calcium (95 percent calcium carbonate) and other minerals that help your garden thrive. They act as a sort of slow-release fertilizer, reduce the acidity of the soil and help aerate it, too.

Many gardening experts, including well-known Canadian gardener Marjorie Harris, say crushed eggshells also work as a slug and snail repellent. Sprinkling crushed eggshells around the plants where slimy little pests like to dine is believed to discourage them; the abrasive sharp edges of the eggshells keep soft-bellied land molluscs from crossing the shells to get to the plants.

Even after the growing season is over, you can still save your eggshells. Store them in a container and they will keep all winter. When spring rolls around again, you've got a great supply!

The many uses of a pretty kitchen towel by Suzanne

DSC_0878-686x1024.jpg

I have a penchant for a pretty kitchen towel (or dish towel as it’s also known). It’s an essential item and in constant use in our kitchen. If it’s a beautiful colour or pattern it has the capacity to elevate the mundane; it provides me a simple pleasure in the split second it takes to dry my hands or wipe a spill.

The other thing I love about a kitchen towel is it becomes better over time. The more you use and wash it, the softer and more absorbent it becomes.

A kitchen towel is not for just drying dishes either. Here are a few more ways to use one.

DSC_0807-609x1024.jpg

Get rid of that dish rack. Instead, lay dishes out on a pretty kitchen towel.

I find salad spinners a paint to clean. Instead, I wrap just-washed greens in a towel and store in the fridge until dinnertime. They turn extra-crunchy as they dry.

DSC_0859-725x1024.jpg

Put a kitchen towel under a mixing bowl and whisk away; the towel will prevent the bowl from moving.

DSC_0814-686x1024.jpg

Wrap a bottle of wine in a pretty dish towel for a two-in-one hostess gift.

DSC_0887-686x1024.jpg

When folded on itself, a kitchen towel doubles as a pad for grasping hot pot handles, lids and dishes.

A pretty kitchen towel is a great gift idea. Beautiful and functional.

Make Your Own Coconut Milk Ice Cream by Suzanne

DSC_0606-686x1024.jpg

For years now, because of family members with food sensitivities, ice cream has not found its way into our freezer. That was, until companies started making rather delicious alternatives to cow's milk ice cream. Our favourite has been this coconut milk ice cream, which I think tastes as good as -- if not better -- than conventional ice cream. But at a whopping eight dollars a pint, we thought: wouldn't it be cheaper to make it ourselves? Wouldn't it be fun?

The great thing about making it yourself is it's easy and only calls for a few ingredients.  Here's a basic recipe:

1 and 1/2 cup (375 ml) coconut milk

1/3 cup (85 ml) raw honey

2 tsp (10 ml) vanilla extract

1 tbsp (15 ml) coconut oil

You can get really creative because of this common base of ingredients. Just check out this pinterest page devoted to the all different varieties you can make. Yesterday I experimented a little and, using the recipe above, made a delicious batch flavoured with mango, cardamom and ginger. I added:

1 chopped mango

a small piece of ginger root

1 tsp of crushed cardamom seeds.

DSC_0532-686x1024 2.jpg
DSC_0503-686x1024 3.jpg
DSC_0514-686x1024 4.jpg

Blend all the ingredients together and transfer to your ice cream maker. Process according to the manufacturer's instructions. (Don't worry if you don't have an ice cream maker. You can still make it without one. Read * note below.)

DSC_0535-685x1024 1.jpg
DSC_0561-686x1024 2.jpg
DSC_0578-686x1024 3.jpg
DSC_0585-686x1024 4.jpg

Eat it straight from the maker if you like your ice cream of soft serve consistency. If eating within the same day as making the ice cream, it will be soft enough to serve straight from the freezer. But after another day of freezing, it becomes quite hard and you will need to sit it on the counter to thaw for about 15 to 30 minutes before serving.

xo

noteIf you don't have an ice cream maker try this method: blend your ingredients, pour the mixture into an airtight container, place it in your freezer for 20 minutes, then take it out and give it a vigorous shake. Repeat this process until it reaches a desired consistency. This method works very well, although it requires you to be on alert so as to not miss each scheduled shaking time.